Tutorials
Figures
Installation Tutorials
Installing GNE for MSVC
Follow these steps to build GNE with the Microsoft Visual Studio .NET 2002 or .NET 2003.
GNE unfortunately does NOT support MSVC 6.
Contents
The first dependency required for GNE is HawkNL. HawkNL can be found at http://www.hawksoft.com/hawknl/. GNE 0.70 was developed using HawkNL 1.66. I believe any HawkNL 1.6 version will work, but 1.66 is suggested. HawkNL 2.0 has not been released yet, so nothing can be said about GNE compatibilty with HawkNL 2.0.
If you compile HawkNL yourself, it is very highly suggested that you compile with NL_WIN_THREADS defined. This will be the default in HawkNL 2.0, but if you compile with NL_WIN_THREADS the pthreads32 library and DLL will not be required and HawkNL will use native Win32 threads.
I also provide a prebuilt version of HawkNL for MSVC.NET and MingW32 users already compiled with the NL_WIN_THREADS option. You can find it from the same location you downloaded GNE from.
Once you have HawkNL compiled, you will have the HawkNL.lib file, the nl.h header, and the HawkNL.dll file. Keep in mind the location of these files, so you can locate them later. For MingW32, the file is HawkNL.a rather than HawkNL.lib.
The second dependency for GNE is the Boost library. Boost can be found at http://www.boost.org/. Most parts of Boost are implemented as templates, which means that NO compiling is needed. None of the parts of Boost that GNE uses require compiling. So you need NOT to compile the Boost library -- I make a special note because the first time I got Boost I tried forever to try to compile it only to discover it doesn't need to be compiled. All that is needed is for you to unpack the Boost library.
GNE was developed using Boost 1.30. There is a bugfix version 1.30.2. I have no reason to believe that GNE will not compile with that Boost version.
Once you have unpacked Boost, you will have a directory strucuture. Keep note of where the Boost_1_30_0 or Boost_1_30_2 library is located, so you can locate it later.
The Boost library download is 10 megs. If you do not already have boost I have provided a minimal version of Boost that includes only the files required for GNE that is around 100k. You can find this file from the same place you downloaded GNE.
If you download this "mini Boost" version, you can unpack it into the include directory of the GNE structure for easiest use, or you can unpack it into a new directory of your choosing. If you unpack it into the GNE\include directory, you should end with a directory structure that looks like this:
- GNE Root
- include
- directory boost
- directory gnelib
- gnelib.h
- include
This will add the "boost" directory into the gne\include directory.
Navigate using Windows explorer to the directory you unpacked GNE. Double click on the solution file gne.sln. If you are using MSVC.NET 2003, you will recieve a message asking to update the format of the projects to .NET 2003. Click yes; the conversion will work flawlessly.
To be the most flexible, the instructions shown here show the steps taken if you keep your libraries separate. If you have copied HawkNL and Boost include files into your MSVC\VC7\include directory, skip this step. Most people prefer not to copy non-Microsoft code files directly into their MSVC installation -- you can follow these instructions to tell MSVC how to find HawkNL and Boost:
Step 4.1: Open the Tools/Options Window
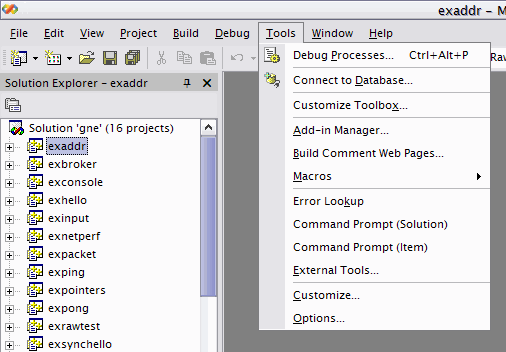
Step 4.2: Open up Include Files Dialog
From the folders on the left, select Projects, then in the dropdown select "Include files"
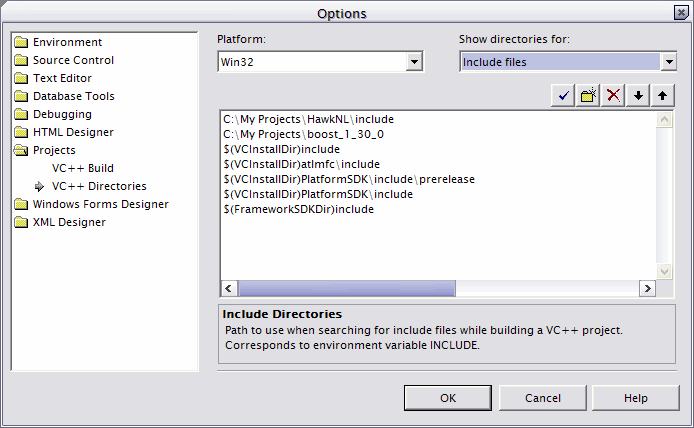
Step 4.3: Add in paths
Press the "New Path" button (looks like a sparkling folder), then click on the "..." button. Browse to the location that contains the nl.h file from HawkNL.
Perform the same steps again, but this time select the Boost folder. If you chose the mini-Boost option and you installed it into the GNE's include folder, then do not add a path for Boost -- it is not needed. If you have Boost installed or you unpacked the "mini-Boost" to a different folder, select that folder. Note that for the folder you select, it should have the sub-folder boost, so that #include <boost/shared_ptr.hpp> would work.
In my example, I've installed a full Boost install to C:\My Projects\Boost_1_30_0, so my directory structure looks like this:
- C:\My Projects\Boost_1_30_0
- boost
- compatiblity, config, detail, and other sub-folders
- shared_ptr.hpp and other hpp files.
- boost
As in Step 4, if you have copied the HawkNL.lib file to your VC7\lib folder, skip this step. If you prefer to keep your libraries separate, follow these instructions:
Follow Step 4.1. Follow step 4.2 except select "Library files" in the dropdown.
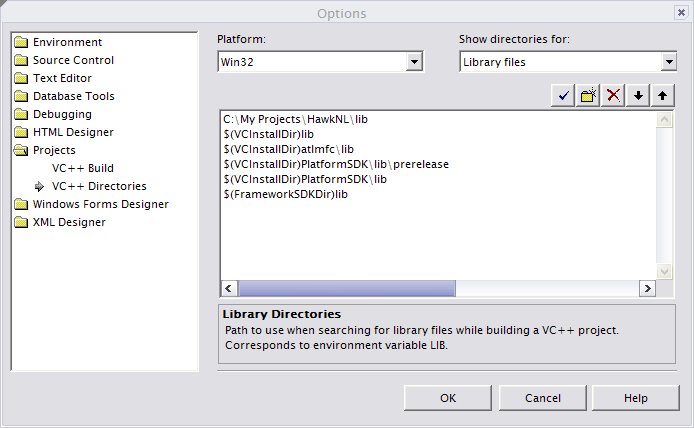
Using a process very similar to that of Step 4.3, add in the path to the directory that contains HawkNL.lib. The example I show is the result of having a full install of HawkNL at C:\My Projects\HawkNL. After following HawkNL's build process it places the file into the lib directory.
If you have installed my precompiled HawkNL version, simply point to the directory in which you placed HawkNL.lib. An example would be "C:\hawk_bin\msvc70" if you unpacked it to C:\.
After setting up the paths, GNE should now compile. First select whether you want to compile debug mode (giving you gned.lib) or in release mode (giving you gne.lib). If you wish to compile GNE and all examples and tests, click Build Solution or press F7. If you wish only to compile the GNE library, right click the project GNE and select build.
The example's EXE files will appear in the examples directory.
Any libraries or EXEs generated in debug mode will contain "d" as the last letter of their name, so it is possible to have debug and release compilations of GNE in the same place.
If you compile the library in release mode, you will receive several warnings on the test "exrawtest" that the variable "e" is an unreferenced local variable. This is because the variable e is used only in an assert statement that runs only in debug mode.
Step 7: Use GNE
Once GNE is compiled, you can use it in your programs using the same configuration you developed to compile GNE. You will need to add GNE's include directory and lib\msvc directory either to your project, or you can add GNE's directories in the same manner you added HawkNL and Boost directories in steps 4 and 5.
To use GNE, you do not need to include HawkNL or Boost headers directly. You can choose to include <gnelib.h> or include <gnelib/Class.h> to use a specific header files. I like using simply <gnelib.h> but it is up to your preference.
Examine the GNE examples, tutorials, and documentation to learn how to write code for GNE.